How to Sharpen Lawn Mower Blades Yourself (DIY Guide)
This article may contain affiliate links. If you make a purchase through these links, we may earn a small commission at no extra cost to you. Learn more
Quick Answer
How to Sharpen Lawn Mower Blades Yourself (DIY Guide)
Disconnect the spark plug, flip the mower, remove the blade bolt, and sharpen both edges at a 30-degree angle with a metal file or bench grinder. Keep the bevel consistent, balance the blade on a nail, and reinstall. Total time: 20 minutes. Do it at the start of every mowing season.
Dull mower blades don't cut grass — they tear it. The torn ends turn brown within 24 hours, stress the lawn, and invite disease. Sharp blades slice cleanly, the lawn looks better, and your mower works less.
Shops charge 30 to 50 dollars to sharpen a blade. The DIY version takes 20 minutes and 0 dollars if you have a file.
Why This Matters
Look at your lawn the day after mowing. If the tips of the grass blades are brown, ragged, or frayed — your mower blade is dull. A sharp blade leaves clean flat cuts that heal overnight.
Most lawn mower blades need sharpening every 20 to 25 hours of mowing — roughly once per season for the average homeowner.
What You'll Need
- A metal file (10-inch mill bastard file is the classic choice) OR a bench grinder
- A bench vise to hold the blade
- A socket wrench or breaker bar (for the blade bolt)
- Work gloves and safety glasses
- A nail (for balance check)
- Marker or chalk
Step 1: Disconnect the Spark Plug
Safety first. Pull the spark plug wire before flipping the mower. An accidental pull start with your hand near the blade is a hospital trip.
Step 2: Tip the Mower Correctly
Tip the mower on its side with the air filter and carburetor UP. Tipping it the wrong way lets oil and gas flow into the air filter, which causes hard starts afterward.
For most mowers, tip it so the spark plug is on top.
Step 3: Mark the Blade Orientation
Before removing, mark the bottom of the blade with chalk or a marker. This tells you which side faces down when you reinstall. Installing a blade upside down means it won't cut.
Step 4: Remove the Blade Bolt
The blade bolt is usually 15mm or 9/16 inch. Wedge a block of wood between the blade and the deck to keep the blade from spinning while you loosen the bolt. Turn counterclockwise.
For stuck bolts, use a breaker bar — the extra leverage breaks free rusted bolts without rounding them.
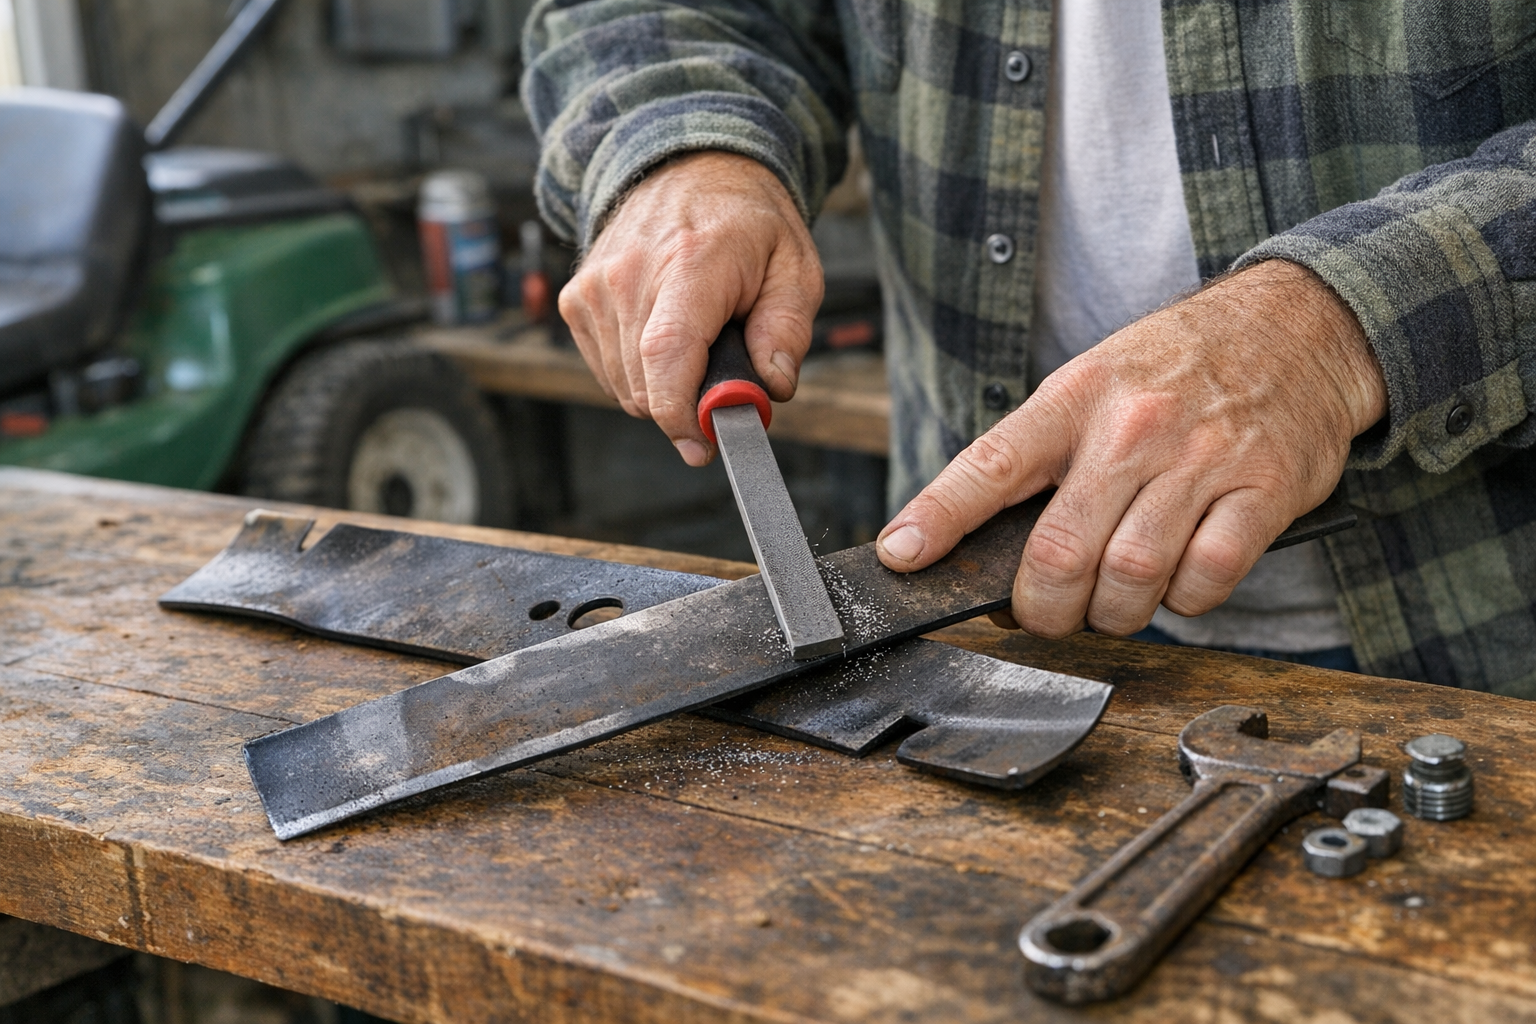
Step 5: Clamp the Blade and File the Cutting Edge
Clamp the blade in the vise with the cutting edge up. The cutting edge is the angled bevel — usually only on the leading edge of each end.
File with the existing bevel angle, usually around 30 degrees. File in one direction only (push strokes), away from you, with steady pressure.
10 to 20 strokes per side is typically enough to restore the edge. You want "paper-sharp" — sharp enough to slice paper with light pressure, but not razor-sharp (razor edges chip against rocks).
Step 6: Sharpen the Other End
Flip the blade, clamp the other side, and sharpen the second cutting edge. Both ends should match — same angle, same amount of metal removed.
Step 7: Balance the Blade
This is the step most DIY guides skip. An unbalanced blade vibrates the mower and ruins the motor bearings.
Hang the blade horizontally by its center hole on a nail sticking out from a wall. If one end droops, that end is heavier. File a tiny amount off the back (non-cutting) edge of the heavy end. Retest.
Keep going until the blade balances evenly.
A blade balancer tool makes this precise and costs under 10 dollars.
Step 8: Reinstall
Slide the blade back on with the chalk mark facing down (toward the ground). Thread the bolt by hand first so you don't cross-thread.
Torque to the manufacturer spec (usually 35 to 50 ft-lbs). Use a torque wrench — too loose and the blade flies off; too tight and you strip threads.
Step 9: Reconnect Spark Plug and Test
Pull the mower upright. Reconnect the spark plug wire. Fill with fresh gas if needed. Start and let run briefly to confirm no weird vibrations.
If it vibrates more than before, recheck the balance — you probably took off more material on one side.
When to Replace Instead of Sharpen
Replace the blade (don't just sharpen) if:
- The cutting edge is pitted or chipped badly
- The blade is bent (check with a straight edge)
- More than 1/4 inch of metal has been filed off over the years
- Cracks anywhere in the blade
A replacement mower blade specific to your mower model runs 15 to 30 dollars.
Frequently Asked Questions
How often should I sharpen mower blades?
Once per season for most homeowners. Twice per season if you have a large lawn (over half acre) or mow dense/tall grass regularly.
Can I sharpen the blade without removing it?
Yes, with a small angle grinder — but you won't get the precision of a removed blade, and you can't balance it. Removing is better.
Do I need a bench grinder?
No. A mill bastard file is slower but gets the job done. Bench grinders are faster for heavy nicks; files are better for routine touch-ups.
What angle should I sharpen to?
Match the existing factory angle (usually 30 degrees). Don't try to make it razor-sharp — the edge will chip the first time it hits a rock. "Paper-cutting sharp" is the right target.
Final Thoughts
Sharp blades cost nothing if you have a file. The lawn looks better within a week, the mower runs easier, and you save the shop fee. Do it at the start of every mowing season as part of spring maintenance.
Get weekly home tips that actually work
Join thousands of homeowners getting practical cleaning hacks, DIY fixes, and money-saving tips every week. Free, and you can unsubscribe anytime.

Written by
Marcus ChenDIY & Home Repair Editor
Marcus Chen spent fifteen years as a licensed general contractor in the Pacific Northwest before joining Practical Home Guides full time. He specializes in plumbing, electrical, and weekend warrior projects that save homeowners thousands. Marcus has personally tested every tool he recommends in his own century-old fixer-upper.
Recommended Products
Looking for specific product recommendations? Check out our tested picks.

Best Cordless String Trimmers (2026 Tested)
Battery-powered string trimmers have caught up to gas. We tested the top models on bermuda, fescue, and overgrown areas to find the picks worth your money.

Best Basement Dehumidifiers (2026 Buyer's Guide)
Damp basements destroy stored items, grow mold, and stink. We tested dehumidifiers for capacity, durability, and energy use to find the picks worth the money.

Best Wet/Dry Shop Vacs (2026 Tested)
Whether you need to clean a flooded basement, dust the garage, or pick up workshop debris, here are the wet/dry shop vacs worth the money.

Best Electric Leaf Blowers (2026 Buyer's Guide)
Cordless and corded electric leaf blowers tested for power, runtime, and noise. Our picks for small yards, large yards, and pro-grade home use.

Best Cordless Lawn Mowers (2026 Spring Buyer's Guide)
Battery-powered mowers have caught up to gas. We tested the top cordless mowers on grass length, slopes, and runtime to find the picks worth your money.

5 Best Cordless Drills for Homeowners (2026)
Find the right cordless drill for home projects without overspending. We compared the top drills for DIYers — here are the 5 best for everyday home use.

Best Home Tool Kits for Beginners (2026)
The best home tool kits for new homeowners and renters. We compare 6 tool sets from basic to comprehensive, so you can handle common repairs without calling a handyman.
Related Articles
Cordless vs. Corded vs. Pneumatic: The Homeowner's Tool System Buying Guide
Cordless, corded, or pneumatic? A homeowner's guide to choosing a power tool ecosystem (DeWalt, Milwaukee, Makita, Ryobi) with a starter-to-advanced path.

End-of-May Home Audit: Fix 5 Summer Safety Issues Before June Heat
A contractor's final spring safety audit. Five critical ventilation, electrical, plumbing, and cooling checks to fix before extreme June heat hits your home.

Backyard Lighting Design: Create Ambiance for Summer Evenings
An electrician's guide to safe backyard lighting design. Layer string lights, path lights, and uplighting in zones for ambiance plus task lighting that lasts.
Budget Outdoor Dining: Building a Patio Table & Bench Setup
A carpenter's plans for a sturdy 2x4 outdoor dining table and bench set that seats 8, costs about 300 dollars in materials, and lasts 20 years.