How to Organize Holiday Decorations (So Setup Takes Half the Time)
This article may contain affiliate links. If you make a purchase through these links, we may earn a small commission at no extra cost to you. Learn more
Quick Answer
How to Organize Holiday Decorations (So Setup Takes Half the Time)
Organize holiday decorations by sorting them by holiday and category, then storing each group in clearly labeled bins with dividers for fragile items. Use a color-coded system -- one color per holiday -- and pack bins in reverse order so the items you set up first are on top. This simple approach cuts your setup time in half and eliminates the annual scavenger hunt.
How to Organize Holiday Decorations (So Setup Takes Half the Time)
Every year, the same scene plays out in homes across the country. The holiday is approaching, you head to the garage or attic to dig out decorations, and you spend the next two hours opening unmarked boxes, untangling lights, and trying to remember which bin has the tree topper versus the Easter table runner. By the time everything is finally out and set up, you've burned an entire afternoon and your enthusiasm for decorating has evaporated.
It doesn't have to be this way. With a solid organizational system, you can cut your holiday setup and teardown time in half -- and actually enjoy the decorating process instead of dreading it. The key isn't buying more storage bins (though you might need a few). It's about creating a repeatable system that makes sense every time you open those bins, whether it's six months from now or six years.
Why Does Holiday Decoration Storage Get So Chaotic?
Before building a better system, it helps to understand why holiday storage falls apart so easily. The answer comes down to three factors that work against you every single season.
Step 1: Recognize the "end of holiday rush" problem. When a holiday ends, you're tired of looking at the decorations and just want them gone. So you toss everything into whatever box is handy, shove it into the back of the closet, and forget about it. That five minutes of careless packing costs you hours the next year when you're trying to find specific items.
Step 2: Acknowledge the accumulation effect. Each year, you add a few new ornaments, a new wreath, a set of string lights on clearance. But you rarely remove anything. Over five or ten years, your holiday collection quietly doubles or triples in size while your storage space stays the same. If you've been meaning to tackle excess belongings in other areas of your home, our guide on how to declutter your home room by room uses the same principle of honest editing that works for holiday items.
Step 3: Accept that "I'll remember where this goes" never works. Without labels and a consistent system, your memory becomes the only index for dozens or hundreds of items. That's a system designed to fail, especially when you only access these items once a year.
What Supplies Do You Need to Organize Holiday Decorations?
You don't need to spend a fortune on organizing supplies, but having the right containers and tools makes a significant difference in how well your system holds up over time.
Step 1: Start with sturdy, uniform-sized plastic storage bins with lids. Uniform sizes stack better and use shelf space more efficiently than a mishmash of different containers. Look for bins in the 18- to 27-gallon range -- large enough to hold a reasonable amount but not so big that they become impossibly heavy when full. Clear bins let you see what's inside at a glance, which saves time during setup.
Step 2: Get a set of cardboard ornament storage boxes with dividers for fragile items. These specialized containers have individual cells that protect glass ornaments, figurines, and delicate keepsakes far better than wrapping each one in newspaper. A single ornament box can hold 48 to 64 ornaments securely, replacing multiple layers of bubble wrap and tissue paper.
Step 3: Gather labeling supplies. You need a permanent marker at minimum, but a label maker produces cleaner, more durable labels that are easy to read from a distance. Label every bin on at least two sides and the top so you can identify contents no matter how the bin is oriented on the shelf.
Step 4: Pick up a few wreath storage bags and a Christmas light storage reel if those items are part of your collection. These purpose-built solutions solve two of the biggest headaches in holiday storage -- crushed wreaths and tangled lights.
For a broader look at the best containers and organizers for every area of your home, check out our guide on the best storage bins and organizers.
How Do You Sort and Declutter Holiday Decorations?
This is the step most people skip, and it's exactly why their system never works. Before a single item goes into a bin, you need to sort everything you own and make honest decisions about what deserves space in your home.
Step 1: Pull out every holiday decoration you own and group them by holiday. Christmas in one area, Halloween in another, Easter in a third, and so on. Include Fourth of July, Thanksgiving, Valentine's Day -- whatever holidays you decorate for. Seeing the full scope of each holiday's collection is eye-opening and often motivating.
Step 2: Within each holiday group, sort items into subcategories: tree ornaments, lights, garlands, tabletop items, outdoor decorations, wreaths, and so on. This subcategory sorting is what makes setup fast later -- instead of digging through one giant "Christmas" box, you'll have a "Christmas -- Tree Ornaments" bin and a "Christmas -- Outdoor Lights" bin.
Step 3: Declutter honestly within each subcategory. Ask yourself three questions about every item. Do you actually use this every year? Is it broken, faded, or worn out? Would you buy it again today if you didn't already own it? Items that fail all three questions should go. Donate what's in good condition and discard what's damaged beyond use.
Be especially ruthless with string lights. Tangled, half-burnt-out strands are not worth saving. Test every set before packing it away. If more than a few bulbs are dead or the strand has frayed wiring, replace it.
How Should You Pack Decorations So They Stay Protected?
Proper packing is the difference between pulling out pristine decorations next season and discovering a box of broken ornaments and crushed bows. The goal is protection without wasted space.
Step 1: Pack fragile ornaments individually into divided ornament boxes. If an ornament is too large for a standard cell, wrap it in tissue paper and place it in a small resealable bag before nestling it into the bin. Never use newspaper -- the ink can transfer to ornaments and stain them permanently.
Step 2: Wrap string lights around a dedicated light reel, a piece of cardboard, or even a clothes hanger. Wind each strand individually so you never deal with tangled masses again. Secure the plug end with a small piece of tape or a twist tie so it doesn't unravel in storage. This single habit will save you more frustration than almost anything else in this guide.
Step 3: Store wreaths in individual wreath bags or large round containers. If you don't have dedicated wreath storage, hang wreaths on hooks inside a closet or on the back of a storage area door. Stacking wreaths flat under heavy bins crushes them and ruins their shape.
Step 4: Pack garlands loosely in large bins, coiling them rather than folding them. Folding creates permanent creases in artificial garlands. Place tissue paper between layers to prevent tangling and keep artificial needles from being flattened.
Step 5: Protect tabletop figurines, snow globes, and other delicate items by wrapping them in bubble wrap or packing paper and storing them in smaller bins with padding at the bottom. Keep these bins where they won't have heavy items stacked on top of them.
Sterilite 64-Quart Latching Storage Box
A heavy-duty, crystal-clear storage bin with secure latching lid that keeps holiday decorations dust-free and visible. Stackable design with reinforced base handles makes it easy to carry even when full. Fits standard shelving units perfectly.
Check Price on Amazon →How Do You Label and Color-Code Everything?
Labeling is the backbone of any holiday storage system that actually lasts. Without clear labels, even the most beautifully packed bins become mystery boxes within a few months. The extra ten minutes you spend labeling today will save you an hour of searching next season.
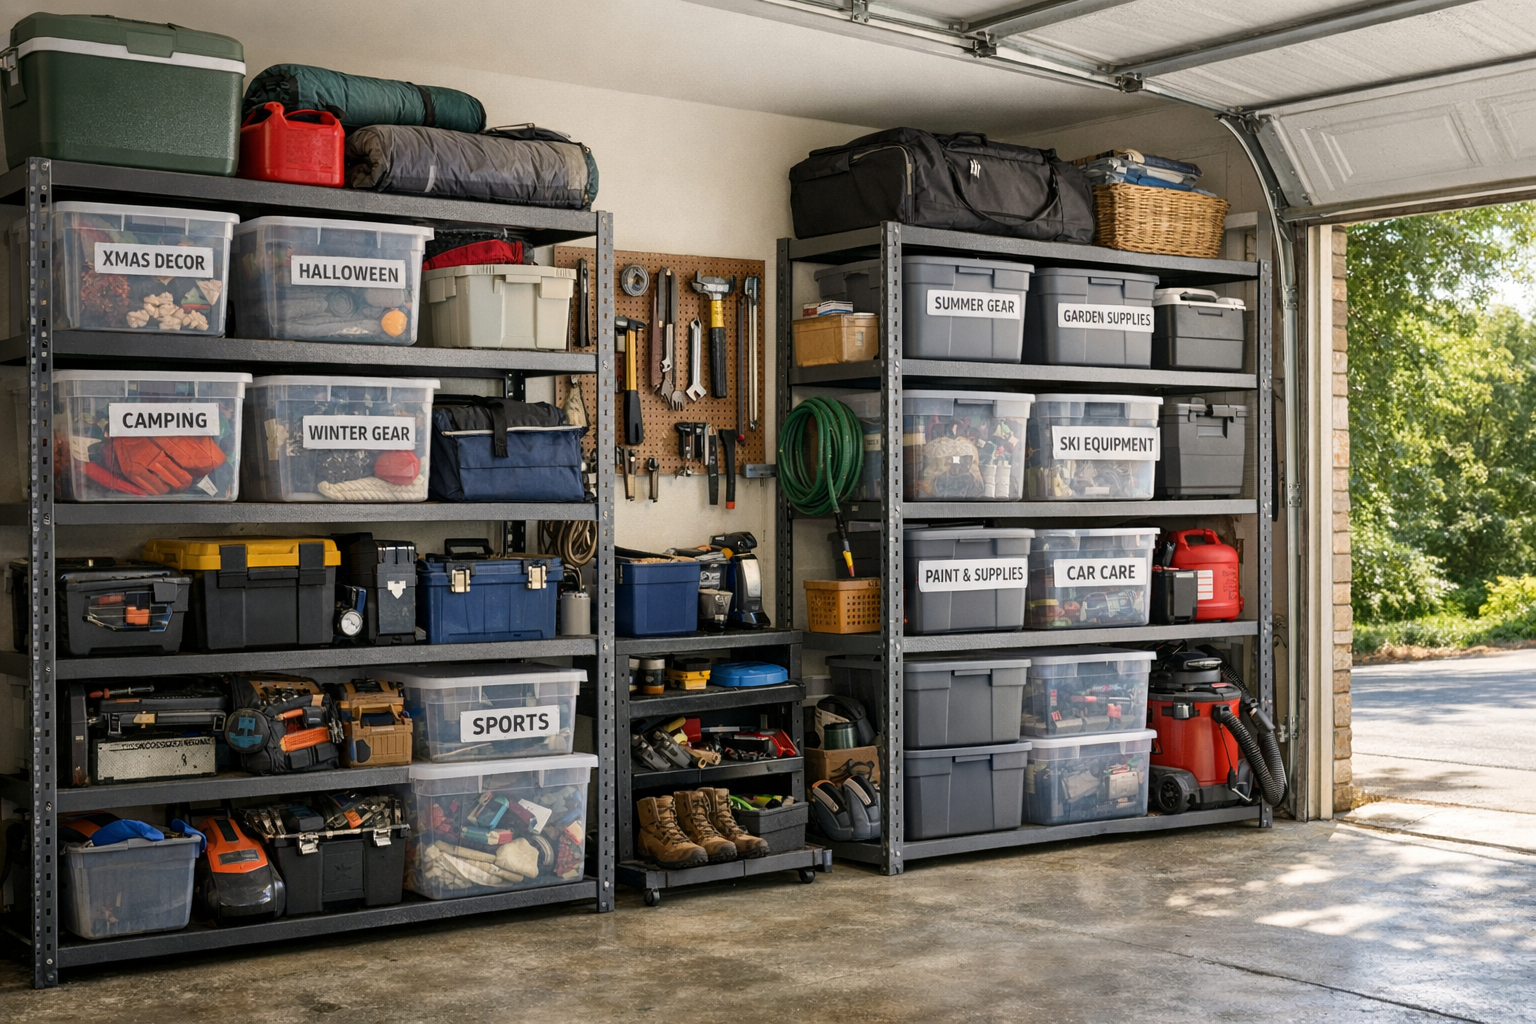
Step 1: Assign a color to each holiday. Red bins or red labels for Christmas, orange for Halloween, pastel yellow or green for Easter, red-white-and-blue for Fourth of July. You can use colored bins, colored tape, or colored label stickers -- whatever is easiest for your budget. The color-coding lets you identify the right holiday's bins instantly, even from across the garage.
Step 2: Write specific, detailed labels on every bin. "Christmas" is not a useful label. "Christmas -- Tree Ornaments -- Fragile" is. "Halloween -- Indoor Tabletop & Candles" tells you exactly what you'll find when you open the lid. Include the contents, the holiday, and a fragile warning if needed.
Step 3: Create a master inventory list. Keep a simple spreadsheet or handwritten list of every bin, what it contains, and where it's stored. Tape a copy to the inside of your storage area door and keep a digital copy on your phone. When you need one specific item, the inventory list tells you exactly which bin to grab without opening five boxes. This approach works wonderfully for keeping your garage organized on a budget too.
Step 4: Number each bin and reference those numbers on your master list. Bin #1 might be "Christmas -- Outdoor Lights, Front Yard," while Bin #7 is "Thanksgiving -- Table Runner, Centerpiece, Candles." Numbering makes it fast to locate exactly what you need and ensures nothing gets lost in the shuffle.
How Should You Arrange Bins for Fast Setup and Teardown?
Where and how you store your bins matters just as much as what's inside them. Smart arrangement means you can get to the right bins quickly without moving everything else out of the way first.
Step 1: Store bins in chronological order based on when you'll need them next. The holiday coming up soonest should be the most accessible. After Christmas, for example, Christmas bins go to the back and Valentine's Day or Easter bins come forward. This rotation system means you're never climbing over Christmas to reach Halloween.
Step 2: Pack each holiday's bins in reverse setup order. The items you decorate with first -- outdoor lights, the tree stand, door wreaths -- should be on top or in the most accessible bin. Items you set up last, like table centerpieces and mantlepiece stockings, can go in bins that are slightly less accessible. This means you unpack in the exact order you decorate, with no wasted trips.
Step 3: Store heavy bins on lower shelves and lighter bins up high. This is a safety issue as much as a convenience one. A 40-pound bin of ceramic village pieces should never be above your head. Lightweight items like garlands, bows, and fabric decorations go on higher shelves. If you're working with limited space, the same vertical storage principles from organizing a closet in a small space apply here.
Step 4: Keep a small "setup essentials" bin at the very front of your holiday storage area. This bin contains hooks, command strips, extension cords, replacement bulbs, batteries, and a small toolkit -- everything you need to actually install decorations. Having these supplies together means you don't waste time running to the hardware store or hunting through the junk drawer during setup.
How Do You Handle Specialty Items Like Artificial Trees and Inflatables?
Some holiday decorations don't fit neatly into standard bins. Artificial Christmas trees, large yard inflatables, and oversized figures need their own storage strategies.
Step 1: Invest in a proper artificial tree storage bag for your Christmas tree. These bags are designed to protect the tree from dust and moisture while compressing it for efficient storage. Most have wheels on the bottom so you can roll the tree to and from storage without straining your back. Avoid shoving the tree back into its original cardboard box year after year -- the box deteriorates and provides no real protection.
Step 2: Deflate inflatables completely before storing them. Fold them loosely -- tight folding creates creases that weaken the material over time -- and store them in a bin or bag that protects them from sharp objects and rodents. Include the power cord and stakes in the same container so everything is together when you set up next year.
Step 3: For large nativity scenes, village displays, or other multi-piece collections, photograph the completed setup before disassembling. Store the photo (printed or on your phone) with the bin so you have a reference for recreating the arrangement next year. This saves the guesswork and arguments about "where that one shepherd is supposed to go."
Step 4: Store outdoor stakes, metal frames for light displays, and yard sign holders in a tall, narrow bin or bundled together with bungee cords. These awkward items tend to scatter and get lost when mixed with other decorations.
If you're looking for more ways to make the most of limited storage space, our guide on organizing your entryway to stop clutter covers similar strategies for making high-traffic areas work harder.
How Do You Maintain the System Year After Year?
An organizational system only works if you maintain it. The good news is that maintenance takes very little effort once the system is established -- as long as you follow a few key habits during both setup and teardown.
Step 1: Adopt a "one in, one out" policy for holiday decorations. When you buy a new ornament, retire an old one. When you upgrade your string lights, get rid of the old set immediately instead of keeping it as a backup. This prevents the slow accumulation that overwhelmed your old system.
Step 2: Do a quick condition check during teardown each year. As you pack items away, inspect them for damage. Discard broken ornaments, burned-out lights, and anything with visible wear. It's much easier to purge when items are already out and you can see their condition clearly. This same end-of-season audit principle applies to other maintenance routines -- our guide on saving money on home maintenance covers how regular check-ins prevent costly problems.
Step 3: Pack with next year in mind, not just "get it done" convenience. Take the extra five minutes to wrap fragile items properly, wind lights onto reels, and label any new bins. Future you will be grateful, and past you will feel like a genius.
Step 4: Update your master inventory list every time you add or remove items. Cross off broken ornaments you discarded and add the new wreath you bought at the after-holiday sale. Keeping the list current is what keeps the system alive.
Step 5: Schedule post-holiday packing on a specific day, not "whenever you get around to it." Put it on the calendar. Treat it like an appointment. When you have a dedicated time block, you're more likely to pack carefully instead of rushing.
If you're building out organizational systems across your entire home, consider tackling your linen closet next -- the same zone-based approach you've learned here translates perfectly.
Frequently Asked Questions
How many storage bins do most families need for holiday decorations?
Most families who decorate for two to three major holidays need between 8 and 15 bins. A typical Christmas collection fills 4 to 8 bins depending on whether you use an artificial tree and outdoor lights. Halloween usually takes 2 to 4 bins, and smaller holidays like Easter or Fourth of July need 1 to 2 bins each. Start with fewer bins than you think you need -- the sorting and decluttering step usually reduces your collection more than you expect.
Should you store holiday decorations in the attic, garage, or basement?
Each location has trade-offs. Attics get extremely hot in summer, which can melt candles, warp plastic, and degrade adhesives on artificial greenery. Basements are prone to moisture and flooding, which can cause mold on fabric items. Garages offer the best balance for most homes -- moderate temperatures, easy access, and plenty of shelving space. Wherever you store decorations, keep them off the floor on shelving or pallets to protect them from water damage.
How do you prevent mice and insects from getting into stored decorations?
Use hard-sided plastic bins with tight-fitting lids rather than cardboard boxes, which rodents chew through easily. Avoid storing food-related decorations (like candy cane ornaments or potpourri) that attract pests. Place a few cotton balls soaked in peppermint oil inside each bin as a natural deterrent. Check your storage area for gaps or entry points and seal them with steel wool or caulk. Mothballs work but leave a strong odor that can transfer to fabric decorations, so peppermint oil or cedar blocks are better choices.
Is it worth buying after-holiday storage supplies on clearance?
Absolutely. Holiday storage containers, ornament boxes, wreath bags, and light reels typically go on sale for 50-75% off in the weeks after Christmas and other major holidays. This is the best time to upgrade your storage system without spending full price. Just make sure you buy what you actually need based on your current collection -- don't stockpile bins for decorations you might buy someday.
Final Thoughts
Organizing holiday decorations isn't about being a perfectionist -- it's about making the holidays more enjoyable. When you can walk into your storage area, grab the right bins in five minutes, and have everything set up in an hour instead of an entire afternoon, decorating becomes the fun tradition it's supposed to be instead of a dreaded chore.
The system you've built here -- sorting by holiday and category, packing in reverse setup order, labeling clearly, and maintaining a master inventory -- works for every holiday and scales with your collection. Whether you decorate for one holiday or ten, the principles are the same.
Start this year by tackling whatever holiday is coming up next. Sort, declutter, pack properly, and label everything. You'll spend a little extra time on the teardown, but the payoff hits the moment you open those bins next season and everything is exactly where it should be. That feeling alone makes the entire effort worth it.
Get weekly home tips that actually work
Join thousands of homeowners getting practical cleaning hacks, DIY fixes, and money-saving tips every week. Free, and you can unsubscribe anytime.

Written by
Beth SullivanFounder & Editor-in-Chief
Beth Sullivan is the founder of Practical Home Guides. With over a decade of hands-on experience tackling every home challenge imaginable, she started this site to share the practical, no-nonsense solutions she wishes she had found years ago. When she's not testing cleaning hacks or organizing pantries, you'll find her in the garden or working on her next DIY project.
Recommended Products
Looking for specific product recommendations? Check out our tested picks.
Best Garage Shelving Systems (2026 Tested)
Wire shelving, freestanding steel, wall-mounted, and overhead — we tested the garage shelving systems that hold real weight without sagging.
5 Best Closet Organizer Systems Under $100 (2026)
Transform your cluttered closet without spending a fortune. We compared the top closet organizer systems under $100 — here are the 5 best for different closet sizes and needs.
Best Storage Bins and Organizers for Every Room (2026)
The best storage bins, baskets, and organizers for closets, pantries, bathrooms, and garages. Practical picks at every price point to get your home organized.
Related Articles
The Complete Home Organization System: A Room-by-Room Master Plan
A room-by-room home organization master plan with a proven system, product picks, and a realistic schedule to organize your entire house without burning out.
Hurricane Season Prep: June 1 Home Readiness Checklist for Coastal Areas
A June 1 hurricane readiness checklist for coastal homes: build your emergency kit, harden the property, and stockpile supplies before the season peaks in fall.

Graduation Gift: Tech Essentials for College Success
The 2026 graduation tech gift list that balances budget and function: laptop, noise-canceling earbuds, power bank, and the upgrades worth your money.

Summer Bedroom Comfort: Cooling Bedding & Sleep Setup Guide
A sleep coach's guide to staying cool in hot weather: breathable bedding, pillow placement, and temperature hacks for better rest from May through August.