Bathroom Upgrade on a Budget: 5 DIY Fixes That Sell Houses
This article may contain affiliate links. If you make a purchase through these links, we may earn a small commission at no extra cost to you. Learn more
Quick Answer
Bathroom Upgrade on a Budget: 5 DIY Fixes That Sell Houses
The five highest-return bathroom fixes a buyer actually notices are a new faucet, sealed and re-whitened grout, a fresh vanity light, crisp white caulk lines, and a toilet that fills silently. All five together run under $200 in parts and one weekend of work, and they read as a 'cared-for' bathroom on a walkthrough.
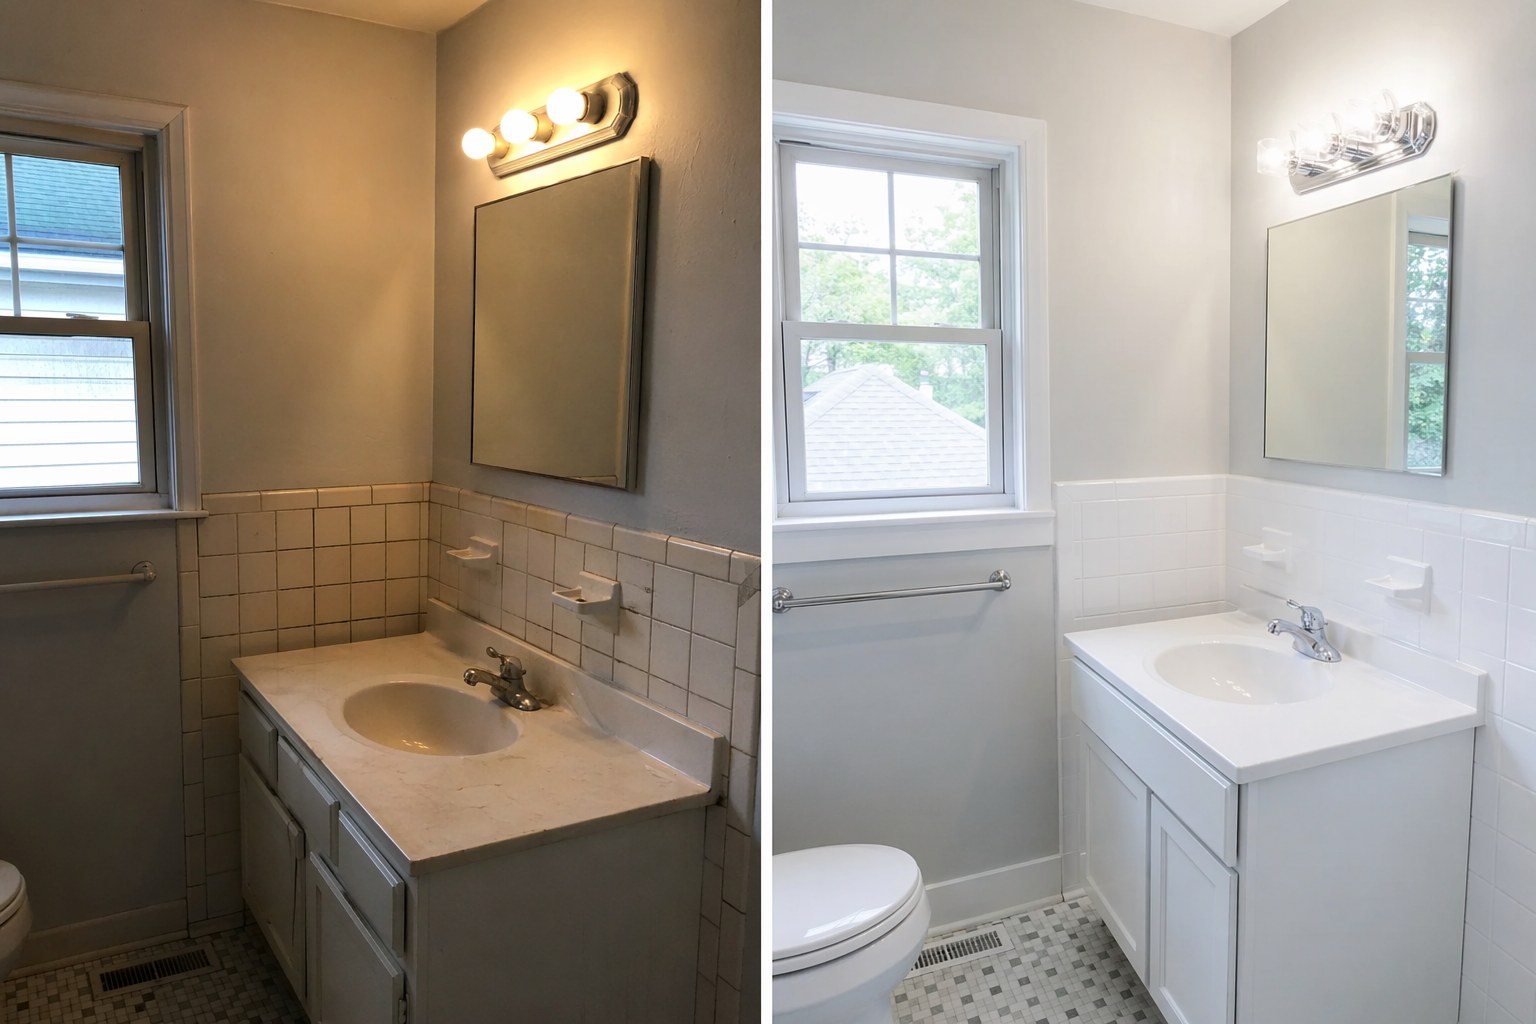
I have walked through a lot of houses with buyers and agents, and I can tell you exactly where eyes go in a bathroom. Nobody is admiring your tile layout. They are looking at the faucet, the light over the mirror, and whether the grout and caulk look like something grew in them. A bathroom that reads as cared-for sells. A bathroom that reads as neglected makes a buyer mentally subtract ten grand for a "gut job" that the room does not actually need.
The good news is that the stuff buyers react to is cosmetic, and cosmetic is cheap. I have spent thousands on bathroom remodels for clients, and I have also handed homeowners a $200 parts list that made their bathroom photograph and show like a different room. The five fixes below are the second kind. None of them require a plumber, a permit, or more than a free weekend. Let me walk you through them in the order I would actually do them, because that order matters.
Why Small Bathroom Fixes Punch Above Their Price
Here is the contractor logic behind all of this. A buyer cannot see inside your walls, and they assume the worst about anything that looks tired. A spotted, mineral-crusted faucet and a yellowed caulk line are not big problems, but they signal deferred maintenance, and deferred maintenance is what kills offers. When the visible touchpoints look new, the brain fills in the rest as "well maintained."
The math is simple. The whole list below comes in under $200 in parts. Even a modest bathroom refresh that nudges a buyer from "needs work" to "move-in ready" is worth far more than that at the closing table, and you are not paying a contractor $75 to $150 an hour to do work you can knock out yourself. The return on a Saturday afternoon here is the best in the whole house, period.
A quick word before we start: do the wet work in an order that lets things cure. Caulk and grout sealer both need dry, undisturbed time, so I save them for last and do the swaps — faucet, light, fill valve — first.
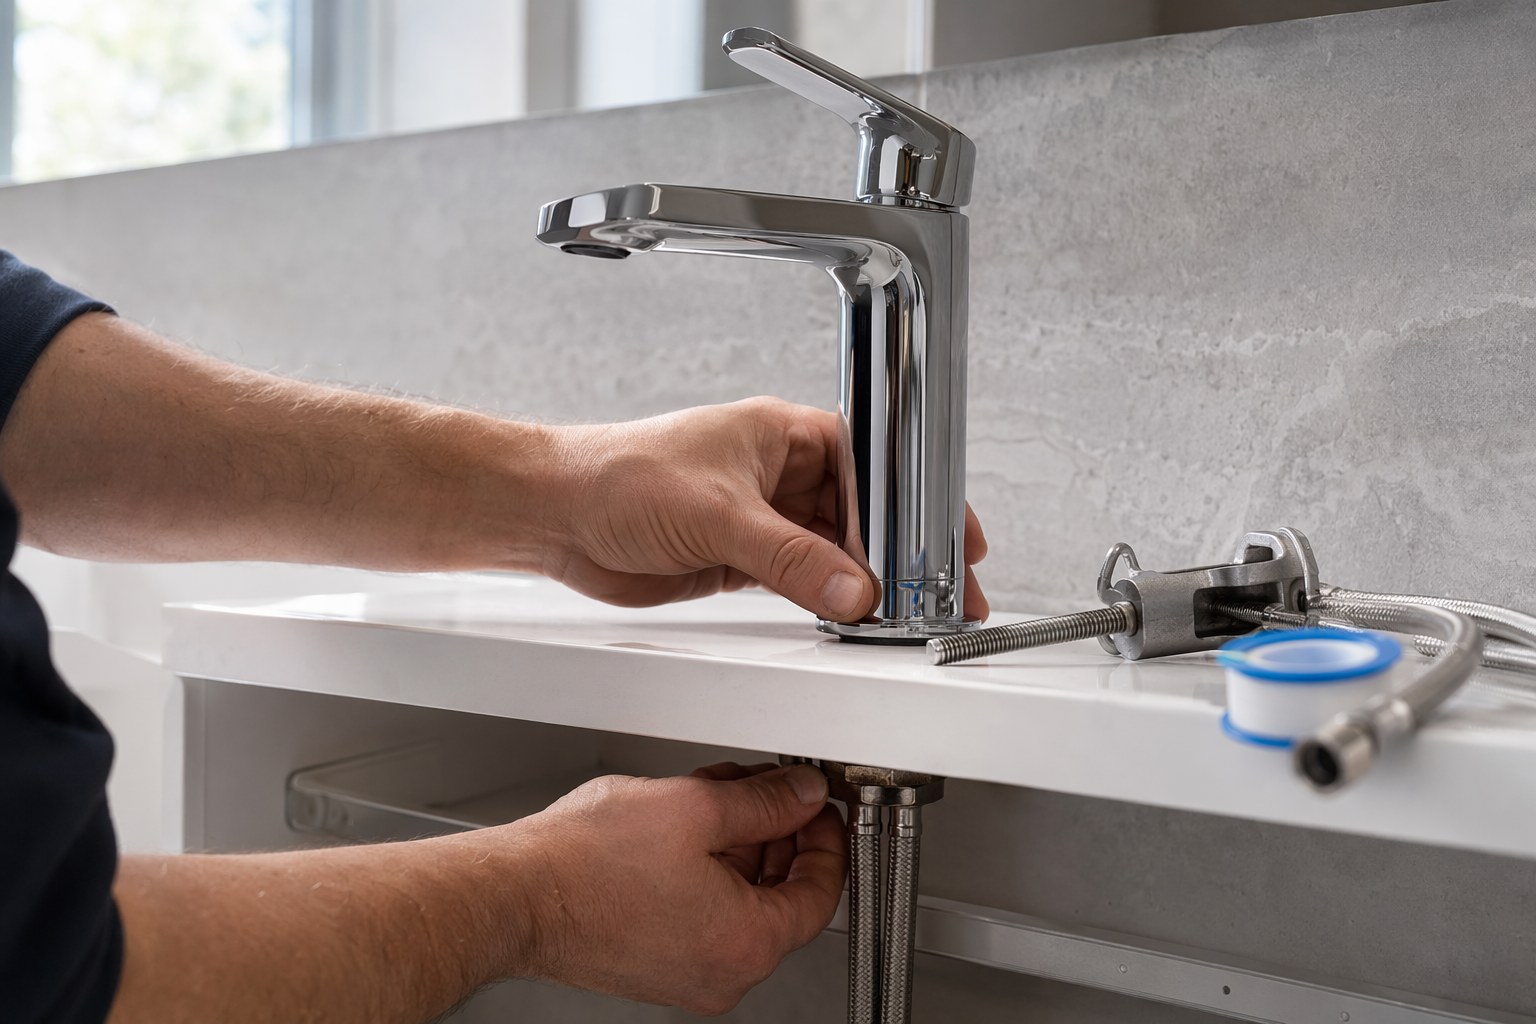
Fix 1: Swap the Faucet (The One Buyers Touch)
The bathroom faucet is the single highest-impact part on this list. It is the thing a buyer reaches out and touches, and an old, pitted, drippy faucet drags the whole vanity down with it. A clean modern faucet in brushed nickel or chrome makes a 1990s vanity look intentional instead of dated.
Swapping a single-hole or three-hole bathroom faucet is a genuine beginner job. You will need an adjustable basin wrench, plumber's tape, and a towel to lie on. The whole thing is about 45 minutes the first time.
Here is the sequence I follow every time:
- Shut the supply valves under the sink (turn clockwise) and open the faucet to drain the lines.
- Disconnect the supply lines from the faucet tailpieces. Have a small bucket or rag ready; there is always a little water left.
- Loosen the mounting nuts from underneath with the basin wrench — this is the knuckle-skinning part, and the basin wrench is what saves you.
- Lift the old faucet out, clean the deck, and drop the new one in, sealing the base per the instructions (some use a gasket, some want a bead of plumber's putty).
- Reconnect the supply lines, wrap the threads with plumber's tape, snug them (do not gorilla them — overtightening cracks fittings), and turn the water back on slowly while watching for drips.
Moen Chrome Bathroom Faucet Single Hole
A clean single-hole faucet from a brand whose cartridges are easy to source later. Spot-resist chrome hides water spots, which is exactly what you want a buyer to see.
Check Price on Amazon →If you turn the water on and find a slow drip at the base or the handle rather than a clean install, do not panic — that is almost always a loose connection or a tired washer, and my guide on how to fix a leaky faucet walks through diagnosing it. While you are under there, replace those crusty old chrome-plated supply lines with braided stainless ones for a few dollars. Buyers' agents look under the sink, and a clean cabinet with new braided lines tells them somebody competent owns this house.
Fix 2: Seal and Brighten the Grout
Nothing reads "old bathroom" faster than grimy, gray grout lines that used to be white. Most people assume that means a re-tile. It almost never does. Ninety percent of the time the tile is fine and the grout just needs to be cleaned, brightened, and sealed.
Start by scrubbing the grout with a stiff nylon brush and a paste of baking soda and a little water, or an oxygen-bleach cleaner. Let it sit, scrub, rinse. If the lines are stained beyond cleaning, a grout pen or grout colorant will re-whiten them in an afternoon — you are essentially painting the grout lines with a fresh color that locks in.
Once the grout is clean and bone dry, seal it. This is the step everybody skips and the reason their grout gets dingy again in three months. A penetrating sealer keeps water and grime out of the porous grout so your work actually lasts.
Porcelain Tile Caulk Bright White
For the change-of-plane joints where two tiled walls meet, a bright-white tile caulk gives a crisp line that grout cannot — grout cracks in corners, flexible caulk does not.
Check Price on Amazon →One pro distinction that trips people up: grout goes in the flat field joints, but the inside corners and the line where the tile meets the tub or counter should be caulk, not grout. Those spots flex, and grout in a flexing joint cracks every time. If your shower has glass doors that have gone cloudy from buildup, clean those too — my walkthrough on removing soap scum from shower doors pairs perfectly with a grout day and makes the whole enclosure look reglazed.
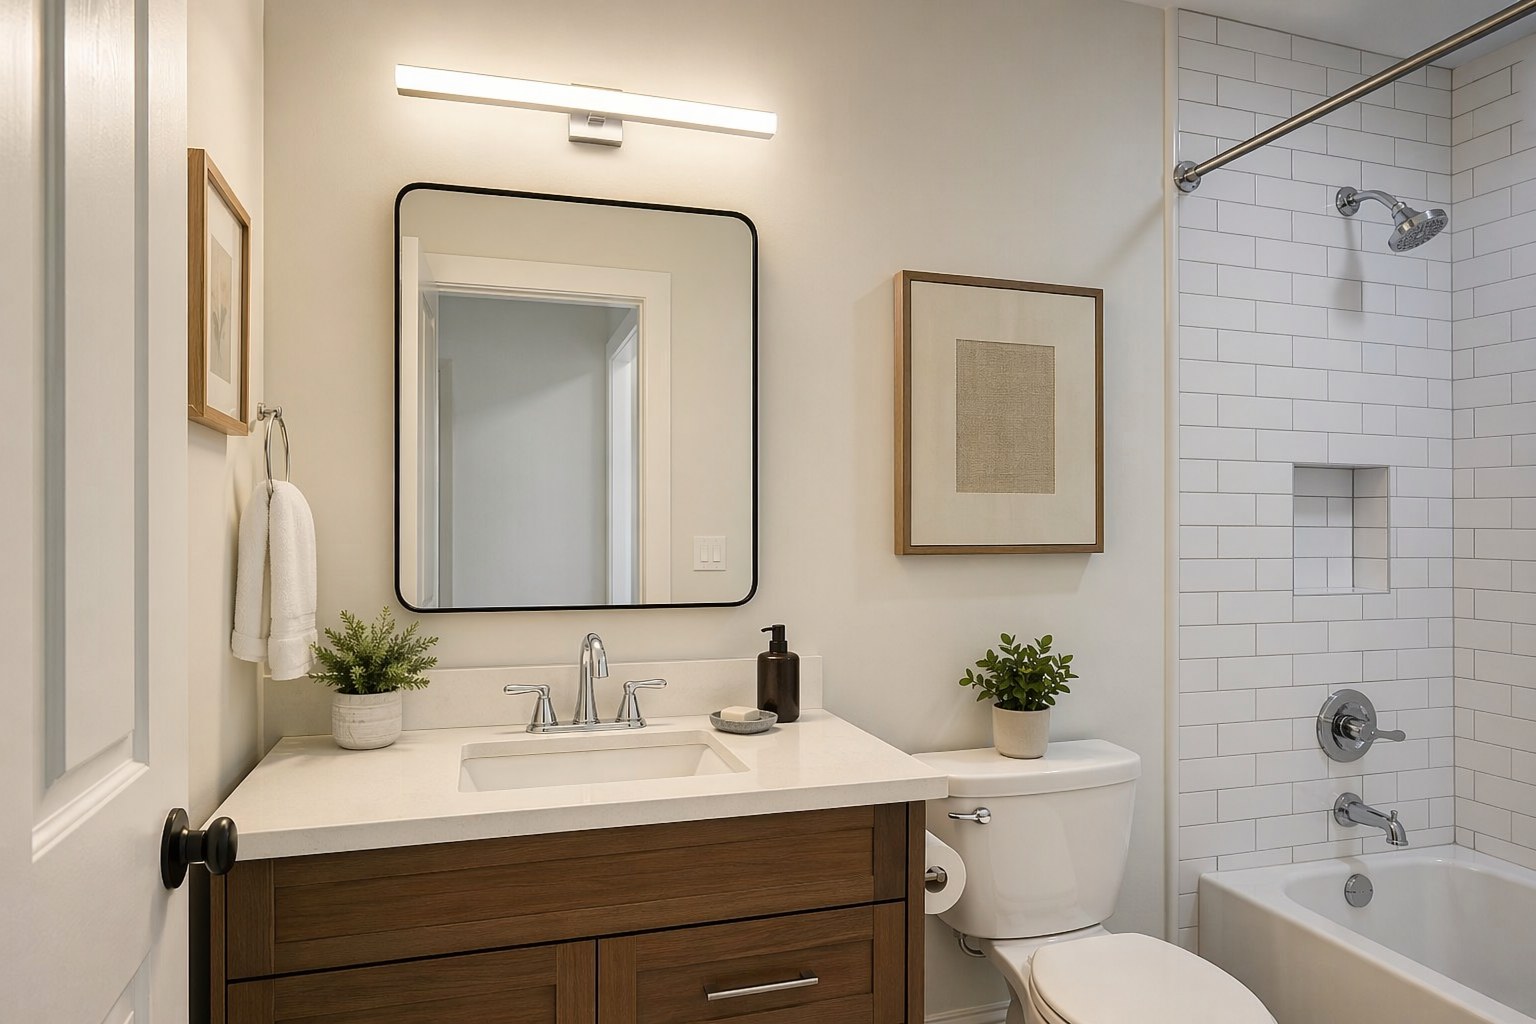
Fix 3: Replace the Vanity Light
Lighting is the cheapest way to change how a whole room feels, and bathroom lighting is usually the worst in the house. That single dim globe fixture or the 1980s "Hollywood" bar of round bulbs makes skin look terrible and the whole room look small and yellow. Swap it for a clean LED vanity bar and the bathroom instantly looks brighter, larger, and newer in photos and in person.
A like-for-like fixture swap is straightforward, but it is electrical work, so respect it. Kill the breaker for the bathroom — do not trust the wall switch — and confirm the wires are dead with a non-contact voltage tester before you touch anything. From there it is matching wires: white to white, black to black, ground (bare copper or green) to ground, then mounting the new fixture to the existing electrical box.
LED Bathroom Vanity Lights 24-inch
A 24-inch LED vanity bar in a neutral 3000K-4000K color. Integrated LED means no bulbs to match later and a clean, current look that photographs bright.
Check Price on Amazon →Pick a bulb color in the 3000K to 4000K range. Go warmer and it looks dingy; go full daylight (5000K and up) and it looks like a hospital. If you have never done any electrical work, the comfortable place to start and build confidence is something simpler in the same box family — my step-by-step on replacing a light switch uses the exact same shut-the-breaker, test-it-dead, match-the-wires routine, and it is a great warm-up before you tackle the fixture overhead.
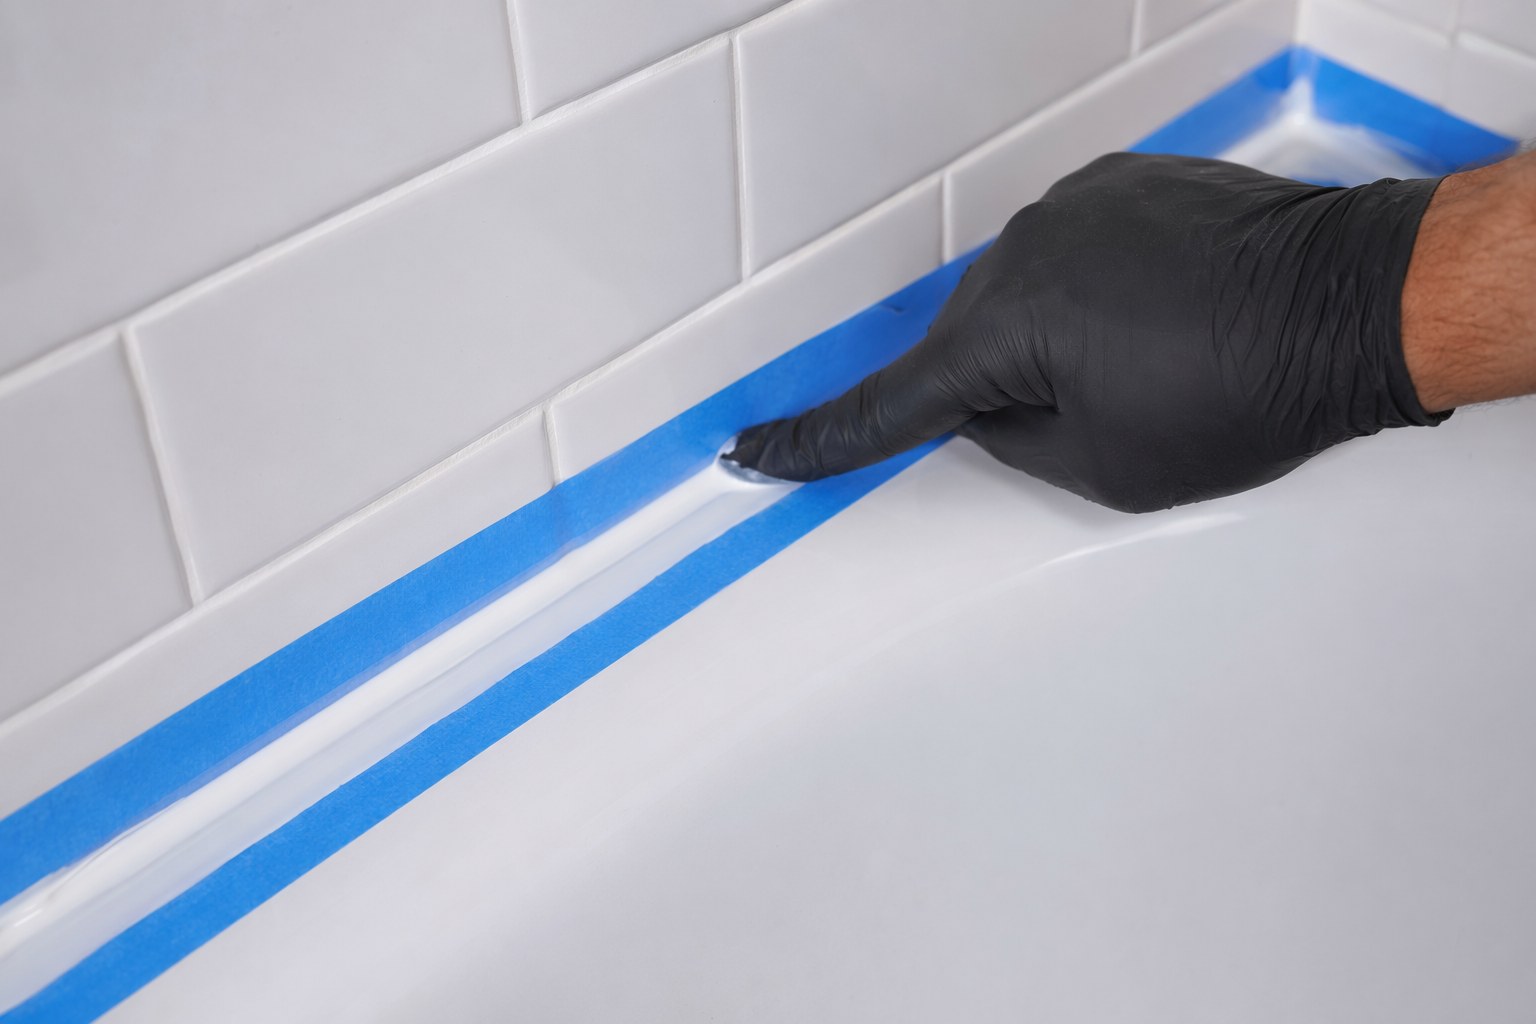
Fix 4: Re-Caulk Every Joint, Crisp and White
If I had to name the single cheapest fix that changes how clean a bathroom looks, it is fresh caulk. Yellowed, peeling, mildewed caulk around the tub, the backsplash, and the base of the toilet is the visual equivalent of a dirty collar on a nice shirt. Strip it out and lay a crisp white bead, and the whole room snaps to attention.
Use a 100% silicone, mildew-resistant caulk labeled for kitchen and bath — never painter's latex caulk, which is not waterproof enough for a wet wall and will fail in a year.
Caulk Bathroom Silicone Waterproof Paintable
A mold-resistant kitchen-and-bath silicone for the tub surround and backsplash. Buy a dripless caulk gun with it; the smooth, even bead is what sells the job.
Check Price on Amazon →The trick to a line that looks like a pro did it: remove every scrap of the old caulk first, run blue painter's tape on both sides of the joint about an eighth of an inch back, lay a thin bead, smooth it once with a wet finger, and pull the tape while the caulk is still wet. Do not skip the tape — it is the difference between amateur and professional in five extra minutes. The most common spots are the tub-to-wall joint and the base of the toilet. I cover the tub joint in full detail, including the fill-the-tub-with-water pro move, in my how to caulk a bathtub guide. Give it the full 24 hours to cure before anyone showers, or the bead peels right back off.
Fix 5: Silence the Running Toilet
This one is not glamorous, but a toilet that hisses, runs intermittently, or takes forever to fill telegraphs neglect louder than almost anything — and a buyer hears it during a quiet walkthrough. A running toilet also quietly wastes hundreds of gallons. The usual culprit is a worn flapper or a tired fill valve, and replacing the fill valve is a 30-minute job for less than $25.
Shut off the supply valve behind the toilet, flush to empty the tank, sponge out the rest, disconnect the supply line, and unthread the old fill valve from under the tank. The new universal fill valve drops in, you set the height, reconnect, and turn the water back on. Adjust the float so the water stops about an inch below the top of the overflow tube.
Kohler Toilet Tank Fill Valve Kit
A universal fill-valve kit that fits most toilets and includes a fresh flapper. Replacing both at once cures the vast majority of running and slow-fill toilets.
Check Price on Amazon →While you are in there with a screwdriver, tighten anything loose — a wobbly toilet seat, a rattling towel bar, a loose door handle on the bathroom door. Buyers grab handles and sit on seats. Every little thing that does not wiggle adds to the impression that the house was loved. The whole point of this list is stacking small "this was cared for" signals until they outweigh whatever else is dated about the room.
My Weekend Game Plan and Budget
Here is how I would actually sequence the whole list so nothing waits on wet curing:
- Saturday morning: Swap the faucet and replace the toilet fill valve. Both are dry-when-done and let you confirm there are no leaks before you move on.
- Saturday afternoon: Kill the breaker and install the vanity light. Then clean the grout and let it dry completely overnight before sealing.
- Sunday morning: Seal the grout, then strip and re-caulk every joint. Tape it, smooth it, pull the tape wet.
- Sunday: leave it alone. Let the caulk and sealer cure a full 24 hours. No showers.
Rough parts budget: faucet $40 to $80, vanity light $40 to $70, fill valve kit $20, caulk and tile caulk $15, grout cleaner/sealer or pen $15 to $25. That lands the whole project comfortably under $200, and it is the best-returning weekend of work you will do on the house.
Frequently Asked Questions
Which of these five fixes adds the most value for the money?
The faucet and the vanity light are the two that buyers notice first, because they are at eye level and one of them gets touched. If you only have time for two, do those. That said, the caulk and grout refresh is the cheapest of the group and arguably the biggest "this bathroom is clean" signal, so it punches far above its $30 cost. Realistically, do all five — the whole list is one weekend.
Do I need a plumber or electrician for any of this?
No, not for a like-for-like swap. Replacing an existing faucet, fill valve, or vanity light reuses the connections that are already there, so no new plumbing or wiring is involved. The only hard rule is the light: shut off the breaker and confirm the wires are dead with a voltage tester before touching them. If you were adding a new circuit or moving a water line, that is a different conversation — call a pro. None of these five fixes go there.
How long should I wait before using the bathroom after caulking?
Give 100% silicone caulk a full 24 hours to cure before any water hits it. It will form a skin in about 30 minutes and feel done, but the inside of the bead is still soft, and an early shower is the number one reason fresh caulk peels within weeks. Plan to caulk when you have access to another bathroom, or do it in the evening and shower the following night.
Will these cosmetic fixes actually matter to an appraiser?
An appraiser is looking at comparable sales and overall condition, not counting your caulk lines — but condition is exactly what these fixes improve. More importantly, they move buyers, and buyers move offers. A bathroom that shows as move-in ready instead of "needs updating" keeps people from mentally deducting for a remodel that the room does not actually need. That perception gap is worth far more than the $200 in parts.
What if my tile or vanity itself is dated, not just dirty?
Then you are weighing cosmetics against a true remodel, and my advice is to do the cheap stuff first and reassess. A surprising number of "dated" bathrooms just look that way because of the grime, the bad light, and the old fixtures — fix those five things and the dated tile suddenly reads as retro-on-purpose rather than neglected. If after all five it still looks tired, that is when you start pricing a vanity or a tile refresh, with clean eyes and a much smaller list.
The Bottom Line
A bathroom does not need a gut job to sell. It needs to look cared for, and "cared for" is a faucet that gleams, a light that flatters, grout and caulk that read as new, and a toilet that does not run. That is a $200 parts list and one weekend with basic tools. I have seen this exact refresh change how a room shows and how fast it moves, and there is no better return on a Saturday anywhere in the house. Pick up the parts this week, block out the weekend, and work the list in order. Your bathroom — and your buyer — will thank you.
Get weekly home tips that actually work
Join thousands of homeowners getting practical cleaning hacks, DIY fixes, and money-saving tips every week. Free, and you can unsubscribe anytime.

Written by
Marcus ChenDIY & Home Repair Editor
Marcus Chen spent fifteen years as a licensed general contractor in the Pacific Northwest before joining Practical Home Guides full time. He specializes in plumbing, electrical, and weekend warrior projects that save homeowners thousands. Marcus has personally tested every tool he recommends in his own century-old fixer-upper.
Recommended Products
Looking for specific product recommendations? Check out our tested picks.

Best Cordless String Trimmers (2026 Tested)
Battery-powered string trimmers have caught up to gas. We tested the top models on bermuda, fescue, and overgrown areas to find the picks worth your money.

Best Basement Dehumidifiers (2026 Buyer's Guide)
Damp basements destroy stored items, grow mold, and stink. We tested dehumidifiers for capacity, durability, and energy use to find the picks worth the money.

Best Wet/Dry Shop Vacs (2026 Tested)
Whether you need to clean a flooded basement, dust the garage, or pick up workshop debris, here are the wet/dry shop vacs worth the money.

Best Electric Leaf Blowers (2026 Buyer's Guide)
Cordless and corded electric leaf blowers tested for power, runtime, and noise. Our picks for small yards, large yards, and pro-grade home use.

Best Cordless Lawn Mowers (2026 Spring Buyer's Guide)
Battery-powered mowers have caught up to gas. We tested the top cordless mowers on grass length, slopes, and runtime to find the picks worth your money.

5 Best Cordless Drills for Homeowners (2026)
Find the right cordless drill for home projects without overspending. We compared the top drills for DIYers — here are the 5 best for everyday home use.

Best Home Tool Kits for Beginners (2026)
The best home tool kits for new homeowners and renters. We compare 6 tool sets from basic to comprehensive, so you can handle common repairs without calling a handyman.
Related Articles
Cordless vs. Corded vs. Pneumatic: The Homeowner's Tool System Buying Guide
Cordless, corded, or pneumatic? A homeowner's guide to choosing a power tool ecosystem (DeWalt, Milwaukee, Makita, Ryobi) with a starter-to-advanced path.
End-of-May Home Audit: Fix 5 Summer Safety Issues Before June Heat
A contractor's final spring safety audit. Five critical ventilation, electrical, plumbing, and cooling checks to fix before extreme June heat hits your home.

Backyard Lighting Design: Create Ambiance for Summer Evenings
An electrician's guide to safe backyard lighting design. Layer string lights, path lights, and uplighting in zones for ambiance plus task lighting that lasts.

Budget Outdoor Dining: Building a Patio Table & Bench Setup
A carpenter's plans for a sturdy 2x4 outdoor dining table and bench set that seats 8, costs about 300 dollars in materials, and lasts 20 years.