How to Fix a Drafty Window (Stop Cold Air and Save on Energy Bills)
This article may contain affiliate links. If you make a purchase through these links, we may earn a small commission at no extra cost to you. Learn more
Quick Answer
How to Fix a Drafty Window (Stop Cold Air and Save on Energy Bills)
To fix a drafty window, start by identifying the source of the air leak using the candle or incense test. Most drafts come from worn weatherstripping, cracked caulking, or gaps between the window frame and wall. Apply new weatherstripping to the moving parts of the sash, re-caulk the exterior frame, and add window insulation film for an immediate improvement -- these fixes cost under $30 and can cut heat loss through that window by up to 70%.

How to Fix a Drafty Window (Stop Cold Air and Save on Energy Bills)
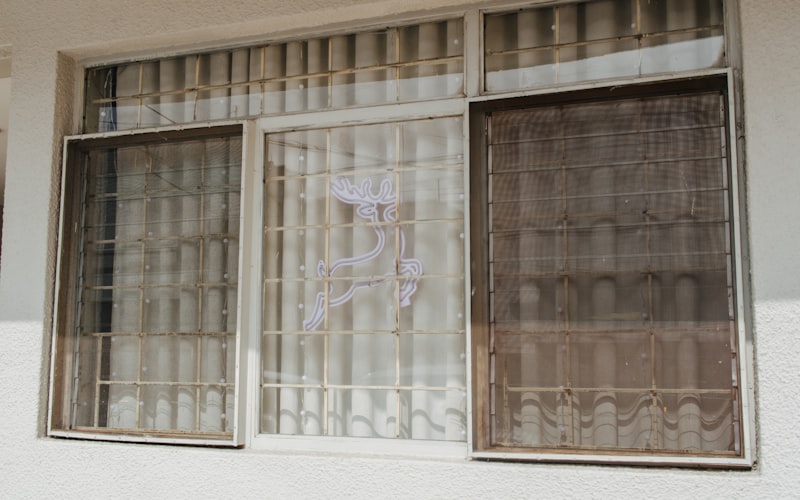
There's nothing quite like settling into the couch on a cold evening, only to feel a steady stream of frigid air creeping in from a nearby window. You crank up the thermostat. Your furnace kicks on. And your energy bill climbs higher. All because one or two windows are letting the outside in.
Drafty windows are one of the most common -- and most overlooked -- sources of wasted energy in any home. According to the U.S. Department of Energy, heat gain and loss through windows accounts for 25-30% of residential heating and cooling energy use. That means a few leaky windows can add hundreds of dollars to your annual energy costs.
The good news is that most drafty windows can be fixed in an afternoon with inexpensive materials and zero special skills. You don't need to rip out the window and install a new one. In most cases, a combination of weatherstripping, caulk, and insulation film will stop the drafts completely and start saving you money on your next heating bill.
If you've been putting up with cold spots near your windows, this guide will walk you through every step of diagnosing and fixing the problem. Let's seal things up.
What Causes a Window to Become Drafty?
Before you grab a tube of caulk, it helps to understand why windows develop drafts in the first place. Knowing the root cause will point you toward the right fix and save you from wasting time and materials on the wrong solution.
Worn or Missing Weatherstripping
Weatherstripping is the flexible seal that sits between the moving parts of your window -- the sash and the frame. Over time, this material compresses, cracks, hardens, and eventually crumbles away entirely. Once the seal fails, air flows freely around the edges of the sash every time the wind blows. This is the single most common cause of drafty windows, especially in homes more than 10-15 years old.
Cracked or Missing Caulk
Caulk fills the gaps between the window frame and the wall opening (the rough framing). On the exterior, it seals the joint between the frame and the siding. Over years of sun exposure, rain, and temperature swings, caulk dries out, shrinks, and cracks. Once it fails, air can pass right through the gap and into your home. If you've already tackled a project like re-caulking your bathtub, you understand how much of a difference fresh caulk makes as a sealant.
Gaps in the Window Frame
Older homes settle over time, and that settling can create gaps between the window frame and the surrounding wall structure. These gaps may be hidden behind interior trim, but the air still finds its way through. You might notice that a draft seems to come from the edges of the window trim rather than from the glass itself.
Failed Glazing or Loose Panes
On older single-pane windows, the glazing putty that holds the glass in the sash can dry out and fall away. This leaves gaps around the glass that let air pass through. On double-pane windows, a broken seal between the panes won't cause an air draft, but it will reduce the window's insulating ability.
The Window Itself Won't Close Properly
Sometimes the problem isn't a failed seal -- it's that the window won't fully close or latch. A sash that doesn't sit tight against the frame leaves an open path for air. If your window is sticking or difficult to close, you may want to address that first with our guide on how to fix a stuck window.
How Do You Find Where the Draft Is Coming From?
Pinpointing the exact source of a draft is the most important step. A draft can come from the sash edges, the frame-to-wall joint, the glazing, or even from around the interior trim. Here's how to track it down.
Step 1: Close all windows and exterior doors in the room. Turn off any fans, HVAC systems, or anything else that moves air.
Step 2: Light a stick of incense or a candle and hold it about an inch from the window. Move it slowly along the edges of the sash, the meeting rail (where upper and lower sashes overlap), the frame-to-wall joint, and around the interior trim.
Step 3: Watch the smoke or flame carefully. Where the smoke wavers, bends, or gets sucked in a direction, you've found an air leak. Mark each spot with a small piece of painter's tape so you don't lose track.
Step 4: Repeat this test on every window you suspect is drafty. You may be surprised to find that the worst offender isn't the window you expected.
If you don't have incense, you can also use a damp hand -- hold the back of your hand near the window and feel for cold air movement. This method is less precise but works well enough for larger leaks.
Once you've identified every leak, you can match each one to the right fix below.
How Do You Fix Drafty Windows with Weatherstripping?
Replacing worn weatherstripping is the single most effective fix for most drafty windows. It addresses the seals around the moving parts of the sash -- the areas that take the most abuse and wear out the fastest.
Choosing the Right Weatherstripping
There are several types available, and the best choice depends on your window style:
- V-strip (tension seal): A durable, long-lasting option made of vinyl or metal. Works well for double-hung and sliding windows. Folds into a "V" shape that presses against the gap.
- Foam tape: The easiest to install and cheapest to buy. Self-adhesive foam strips stick directly onto the frame. Good for a quick fix, but foam compresses over time and may only last 1-3 seasons.
- Tubular rubber or silicone: Excellent for larger gaps. These round or D-shaped gaskets compress when the window closes and spring back when it opens. Very durable.
- Felt strips: Inexpensive but the least durable option. Best used as a temporary fix until you can install something more permanent.
For most homeowners, self-adhesive V-strip weatherstripping offers the best balance of durability, ease of installation, and cost.
3M Indoor Window Insulation Kit + V-Seal Weatherstrip
Complete window draft-proofing bundle with self-adhesive V-strip weatherstripping for sash edges plus shrink-fit insulation film. Covers multiple windows and installs with no special tools.
Check Price on Amazon →Step-by-Step: Replacing Weatherstripping
Step 1: Open the window and remove the old weatherstripping completely. Pull off any adhesive-backed strips and scrape away leftover residue with a plastic putty knife. If the old strips are nailed or stapled in, use pliers to remove the fasteners.
Step 2: Clean the channel or surface where the new weatherstripping will go. Wipe it down with rubbing alcohol to remove dust, old adhesive, and grime. Let it dry completely -- adhesive won't stick to a dirty or wet surface.
Step 3: Measure the length of each section where weatherstripping is needed. Cut the new weatherstripping to size with scissors or a utility knife. It's better to cut slightly long and trim to fit than to cut too short and leave a gap.
Step 4: For self-adhesive strips, peel back a few inches of the backing and press the strip into position starting at one end. Work slowly, peeling and pressing as you go to keep the strip straight and avoid wrinkles or bubbles. For V-strip, fold the strip into its V shape first, then press it into the channel with the open end of the V facing the outside.
Step 5: Close the window and test the seal. The sash should close snugly but not require excessive force. If the window won't close properly, the weatherstripping may be too thick -- try a thinner profile. If there's still a noticeable draft, the strip may not be making full contact and needs to be repositioned.

Properly installed weatherstripping can last 5-10 years on a frequently used window. On windows that rarely get opened, it can last even longer. This one fix alone can dramatically reduce drafts and make a real dent in your heating costs -- a topic covered in depth in our guide on how to save money on your heating bill.
How Do You Seal Window Gaps with Caulk?
If your draft detection test revealed air leaking around the window frame -- the stationary parts where the frame meets the wall or siding -- caulk is the answer. Weatherstripping handles the moving parts; caulk handles everything that doesn't move.
What You'll Need
- A caulk gun (a dripless model is worth every penny)
- Exterior-grade silicone or siliconized acrylic caulk
- A utility knife or caulk removal tool
- A damp rag for smoothing
- Painter's tape (optional, for clean lines)
Step-by-Step: Re-Caulking a Window Frame
Step 1: Remove the old caulk. Use a utility knife to score along both edges of the existing caulk bead, then pull it away in strips. Scrape off any remaining residue with a putty knife. Clean the surface with rubbing alcohol and let it dry.
Step 2: Load the caulk gun and cut the nozzle tip at a 45-degree angle. Start with a small opening -- you can always cut more off, but you can't put it back. Puncture the inner seal with the rod on the back of the caulk gun or a long nail.
Step 3: Apply a steady, continuous bead of caulk along the joint between the window frame and the wall or siding. Keep consistent pressure on the trigger and move at an even pace. Fill the gap completely without overflowing.
Step 4: Smooth the bead immediately with a damp finger or a caulk finishing tool. Run your finger along the bead in one continuous stroke, pressing the caulk into the gap and creating a concave profile that sheds water.
Step 5: Repeat on both the interior and exterior sides of the window. On the interior, focus on the joint where the window trim meets the wall. On the exterior, caulk the joint where the frame meets the siding or brick.
Allow the caulk to cure fully before testing -- most silicone caulks take 24 hours to fully set. Once cured, repeat the incense or candle test to verify the air leak is gone.
How Does Window Insulation Film Help with Drafts?
Window insulation film is one of the most underrated draft-stopping tools available. It creates a layer of still air between the film and the glass -- essentially turning a single-pane window into a makeshift double-pane. Even on double-pane windows, the film adds another insulating barrier that reduces heat transfer significantly.
Step-by-Step: Applying Window Insulation Film
Step 1: Clean the window frame and trim thoroughly. The double-sided tape included in most kits needs a clean, dry surface to adhere properly.
Step 2: Apply the double-sided tape around the entire perimeter of the window frame (on the interior trim, not on the glass). Press it firmly and make sure there are no gaps at the corners.
Step 3: Unroll the shrink-fit window insulation film and cut it a few inches larger than the window opening on all sides.
Step 4: Starting at the top, press the film onto the double-sided tape. Work your way down and around the window, pulling the film taut as you go. Don't worry about wrinkles at this stage.
Step 5: Use a hair dryer on its highest setting to shrink the film. Start in the center and work outward in a circular pattern. The heat causes the film to shrink and pull tight, creating a drum-like surface that's nearly invisible when done properly. Trim any excess film with a utility knife.
The film stays in place all winter and peels off cleanly in the spring. A single kit covering five standard windows costs around $15-20 -- a small investment that can cut heat loss through those windows by up to 50%. When you consider how much that saves on energy costs, it's one of the best return-on-investment projects you can do for your home. For more strategies to lower energy expenses, check out our full guide on how to save money on your electric bill.
What Are Some Additional Ways to Improve Window Insulation?
Once you've addressed the primary sources of drafts with weatherstripping, caulk, and insulation film, there are several more steps you can take to squeeze even more efficiency out of your windows.
Use Thermal Curtains
Thermal-lined curtains add a thick layer of insulation between the cold glass and your living space. Studies show that heavy thermal curtains can reduce heat loss through windows by up to 25% on their own. Open them during the day on south-facing windows to capture free solar heat, and close them at dusk to trap that warmth inside.
Install a Draft Snake
For windows that sit on a sill -- particularly older double-hung windows -- a fabric draft snake (also called a draft stopper) laid along the sill can block air that sneaks under the bottom sash. You can buy one or make your own with a tube of fabric filled with rice or dried beans.
Add Exterior Storm Windows
If you have single-pane windows and replacing them isn't in the budget, exterior storm windows are a cost-effective middle ground. They create an additional air space that dramatically reduces heat loss and eliminates most drafts. Modern low-E storm windows can cut energy loss through single-pane windows by more than 50%.
Spray Foam Around the Frame
If you removed interior trim during your inspection and found gaps between the window frame and the rough framing, a can of low-expansion spray foam insulation is the fix. Use a foam specifically labeled for windows and doors -- standard expanding foam can exert enough pressure to warp the frame and make the window inoperable. Apply it sparingly, let it cure, and then trim the excess flush before reinstalling the trim.
Upgrade to a Smart Thermostat
This doesn't fix the window itself, but a smart thermostat helps you compensate for drafty rooms intelligently. A well-programmed thermostat ensures your heating system isn't overworking to make up for cold spots. For recommendations, take a look at our roundup of the best smart thermostats to save energy.
How Much Money Can You Save by Fixing Drafty Windows?
The savings from sealing drafty windows depend on how many windows you fix, how severe the leaks were, and your local climate. But even conservative estimates are compelling.
- Weatherstripping alone can save 5-10% on your annual heating bill.
- Adding caulk and insulation film on top of weatherstripping can push savings to 15-20%.
- Combining all methods -- weatherstripping, caulk, film, and thermal curtains -- can reduce heat loss through windows by as much as 50-70%.
For a household spending $1,500 per year on heating, a 15% reduction saves $225 per year. The total cost of weatherstripping, caulk, and insulation film for a typical home with 10-15 windows? Around $50-75. That means you recoup your investment within the first month or two of winter.
These savings compound even further in summer, when the same seals prevent cool, conditioned air from escaping. If you're also looking to reduce cooling costs, our guide on how to save money on your cooling bill covers additional strategies that pair well with window sealing.
The bottom line is this: fixing drafty windows is one of the highest-return DIY home repairs you can make to save money. The materials are cheap, the work is straightforward, and the savings start immediately.
Frequently Asked Questions
How do you know if your windows are drafty?
The easiest test is to hold a lit candle or stick of incense near the edges of a closed window on a windy day. If the flame flickers or the smoke bends horizontally, air is leaking through. You can also feel for drafts with the back of your damp hand. Other signs include cold spots near windows, frost forming on the inside of window glass, rattling sashes, and noticeably higher energy bills during cold months.
Is it better to fix a drafty window or replace it entirely?
For most homeowners, fixing the draft is far more cost-effective than replacing the window. A full window replacement costs $300-$1,000 per window installed, while sealing drafts with weatherstripping, caulk, and insulation film costs $5-15 per window. Replacement only makes financial sense if the window frame is rotted, the glass is broken, or the unit is so old and inefficient that no amount of sealing will bring it up to modern standards. In most cases, the DIY fixes in this guide will solve the problem completely.
Can you fix a drafty window in winter?
Yes -- and winter is actually the ideal time to do it because the cold air makes drafts easier to detect. Caulk and weatherstripping adhesives work best when applied at temperatures above 40 degrees Fahrenheit, so aim for a milder day or work on the interior side of the window where it's warmer. Window insulation film can be applied any time of year since it's installed entirely from inside your home.
How long does weatherstripping last on windows?
Most quality weatherstripping lasts 5-10 years on windows that are opened and closed regularly. On windows that stay shut most of the time, it can last even longer. Foam tape is the least durable, typically lasting 1-3 seasons before it compresses and loses its seal. V-strip and tubular rubber or silicone weatherstripping are more resilient and offer the best long-term value. Inspect your weatherstripping at the start of each heating season and replace any sections that look cracked, compressed, or brittle.
Final Thoughts
Fixing a drafty window is one of those satisfying home projects where a small amount of effort delivers a big payoff. For less than the cost of a takeout dinner, you can eliminate cold spots, stop your furnace from running overtime, and start seeing lower energy bills within weeks.
Start by finding the leaks with the candle or incense test. Then work through the fixes in order of impact: replace worn weatherstripping, re-caulk any gaps around the frame, and apply insulation film to your worst-performing windows. Add thermal curtains if you want the maximum possible improvement.
The best part is that every fix you make serves double duty. The same seals that keep cold air out in winter keep cool air in during summer, which means you'll see savings year-round. And once you've experienced how satisfying it is to tackle a project like this, you'll start noticing other easy wins around the house -- a stuck window that needs freeing, a thermostat upgrade that pays for itself, or a weekend spent on money-saving home repairs that keep your home running efficiently for years to come.
Don't wait for next winter to fix the problem. Grab a roll of weatherstripping and a tube of caulk, and give your home the tight seal it deserves.
Get weekly home tips that actually work
Join thousands of homeowners getting practical cleaning hacks, DIY fixes, and money-saving tips every week. Free, and you can unsubscribe anytime.

Written by
Beth SullivanFounder & Editor-in-Chief
Beth Sullivan is the founder of Practical Home Guides. With over a decade of hands-on experience tackling every home challenge imaginable, she started this site to share the practical, no-nonsense solutions she wishes she had found years ago. When she's not testing cleaning hacks or organizing pantries, you'll find her in the garden or working on her next DIY project.
Recommended Products
Looking for specific product recommendations? Check out our tested picks.

Best Cordless String Trimmers (2026 Tested)
Battery-powered string trimmers have caught up to gas. We tested the top models on bermuda, fescue, and overgrown areas to find the picks worth your money.

Best Basement Dehumidifiers (2026 Buyer's Guide)
Damp basements destroy stored items, grow mold, and stink. We tested dehumidifiers for capacity, durability, and energy use to find the picks worth the money.

Best Wet/Dry Shop Vacs (2026 Tested)
Whether you need to clean a flooded basement, dust the garage, or pick up workshop debris, here are the wet/dry shop vacs worth the money.

Best Electric Leaf Blowers (2026 Buyer's Guide)
Cordless and corded electric leaf blowers tested for power, runtime, and noise. Our picks for small yards, large yards, and pro-grade home use.

Best Cordless Lawn Mowers (2026 Spring Buyer's Guide)
Battery-powered mowers have caught up to gas. We tested the top cordless mowers on grass length, slopes, and runtime to find the picks worth your money.

5 Best Cordless Drills for Homeowners (2026)
Find the right cordless drill for home projects without overspending. We compared the top drills for DIYers — here are the 5 best for everyday home use.

Best Home Tool Kits for Beginners (2026)
The best home tool kits for new homeowners and renters. We compare 6 tool sets from basic to comprehensive, so you can handle common repairs without calling a handyman.
Related Articles

How to Paint a Front Door (Pro-Quality Result in One Afternoon)
A fresh-painted front door is the highest-impact curb appeal upgrade. Here's the step-by-step that gets a smooth pro finish in 4 hours — no peeling, no brush marks.
How to Prevent Summer AC Breakdowns (April Tune-Up Checklist)
Most AC failures happen in the first 90F week. A 30-minute April tune-up prevents 80 percent of those breakdowns and extends the unit's life by years.
Best Cordless String Trimmers (2026 Tested)
Battery-powered string trimmers have caught up to gas. We tested the top models on bermuda, fescue, and overgrown areas to find the picks worth your money.

How to Fix Sticky Kitchen Cabinet Doors (Without Replacing Hardware)
Cabinet doors that bind, rub, or won't close all the way are almost always a hinge adjustment problem. Here's the 10-minute fix.